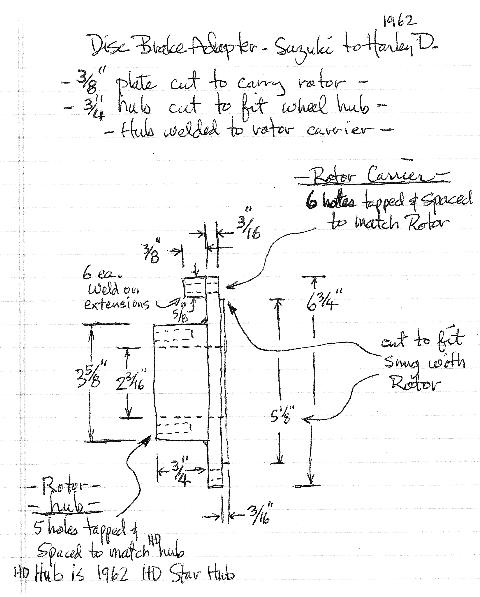
Visited my machine shop buddy, thought about modifying that Suzuki disk carrier vs making a new carrier from scratch, decided on the "new" one. See sketch above.
We'll machine the OD of the part that goes in the star hub with the 5 original HD bolts, I'll tig it to the plate, then he will machine the whole thing to the final specs to keep everything straight, no wobbles....
So I'm hunting for raw materials now.
62 Chopped FL Rebuild
-
2Loose

- Conventioneer
- Posts: 251
- Joined: Wed Aug 27, 2014 12:46 am
- SELF INTRODUCTION: Maui boy, farm systems mechanical engineer, sugar cane and pineapple, retired, chopped a '62 FL in '68, still have it, have five HD projects in the shop right now, three are panheads. Try to work on them every day, but often looking for or waiting for parts. Nothing stock going on here, all hot rod street oriental, and mostly old style.
- Location: Maui
Re: 62 Chopped FL Rebuild
The faster I go, the behinder I get....
I never look over my shoulder, I know what's back there, and it scares the hell outta me !!
I never look over my shoulder, I know what's back there, and it scares the hell outta me !!
-
railroad bob

- Contributor
- Posts: 939
- Joined: Fri Nov 04, 2011 10:07 pm
- SELF INTRODUCTION: Hi Dan, thanks for your time and energy spent on this new board. I hope you will give me a waiver on the email account, I have used gmail so long I don't have a clue what my service provider account is.
I just returned home from a 2 week trip in New Mexico, have a few good pix, can't wait to share my off-highway traveling. Got to put 1400 miles on the scoot.
Best, Bob Davidson - Location: Alaska
Re: 62 Chopped FL Rebuild
does the position of the bleeder valve matter?
Does the caliper need to be oriented so it is on the bottom?
Does the caliper need to be oriented so it is on the bottom?
Alaska - Land of the Individual and Other Endangered Species
An Armed Society is a Polite Society,...
Politicians Prefer Unarmed Peasants
TANSTAAFL
An Armed Society is a Polite Society,...
Politicians Prefer Unarmed Peasants
TANSTAAFL
-
2Loose
- Conventioneer
- Posts: 251
- Joined: Wed Aug 27, 2014 12:46 am
- SELF INTRODUCTION: Maui boy, farm systems mechanical engineer, sugar cane and pineapple, retired, chopped a '62 FL in '68, still have it, have five HD projects in the shop right now, three are panheads. Try to work on them every day, but often looking for or waiting for parts. Nothing stock going on here, all hot rod street oriental, and mostly old style.
- Location: Maui
Re: 62 Chopped FL Rebuild
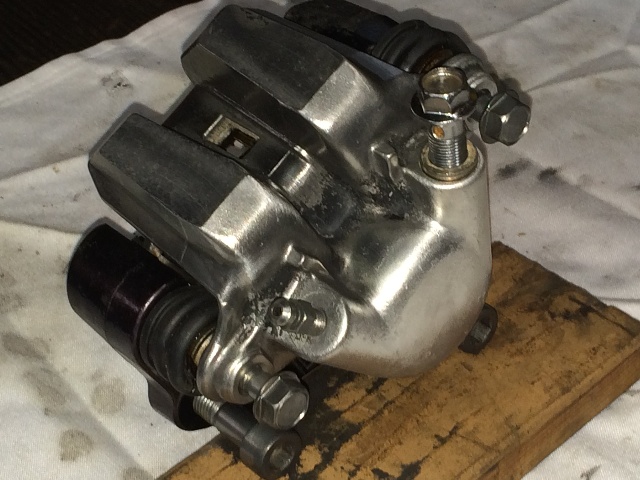
The bleeder needs to be at least at the same level as the actuating hose connection,
Higher is better so the air will move up to the high spot to be bled off.
This left side caliper does have the bleeder positioned to do that,
so at the 12 o'clock position it's level with the pressure port,
and at the 3 o'clock position (left side mount) it's above the pressure port.
I've decided to go with the noon position, that's the bleeder in front on top, and the pressure port hose connection behind it on top.
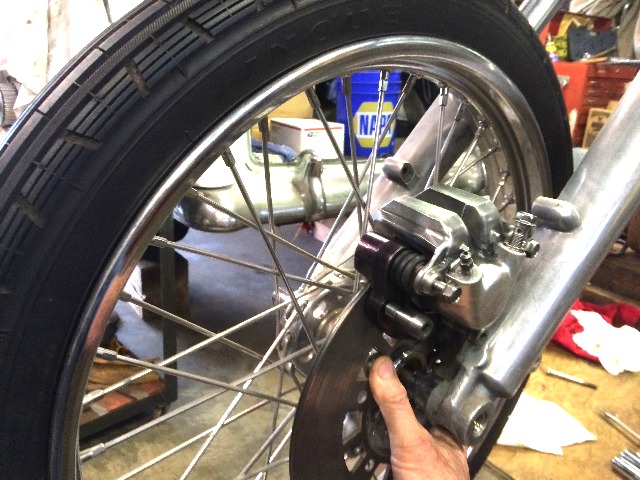
Another shot....
The caliper I took off the right side is set up just the opposite.
Found some 3/8" and some 3/4" steel plate today, will mark it up for my plasma cutter
and take some pix....
Higher is better so the air will move up to the high spot to be bled off.
This left side caliper does have the bleeder positioned to do that,
so at the 12 o'clock position it's level with the pressure port,
and at the 3 o'clock position (left side mount) it's above the pressure port.
I've decided to go with the noon position, that's the bleeder in front on top, and the pressure port hose connection behind it on top.
Another shot....
The caliper I took off the right side is set up just the opposite.
Found some 3/8" and some 3/4" steel plate today, will mark it up for my plasma cutter
and take some pix....
The faster I go, the behinder I get....
I never look over my shoulder, I know what's back there, and it scares the hell outta me !!
I never look over my shoulder, I know what's back there, and it scares the hell outta me !!
-
2Loose
- Conventioneer
- Posts: 251
- Joined: Wed Aug 27, 2014 12:46 am
- SELF INTRODUCTION: Maui boy, farm systems mechanical engineer, sugar cane and pineapple, retired, chopped a '62 FL in '68, still have it, have five HD projects in the shop right now, three are panheads. Try to work on them every day, but often looking for or waiting for parts. Nothing stock going on here, all hot rod street oriental, and mostly old style.
- Location: Maui
Re: 62 Chopped FL Rebuild
Aiming for this:
Found some 3/4" and 3/8" mild steel plate:
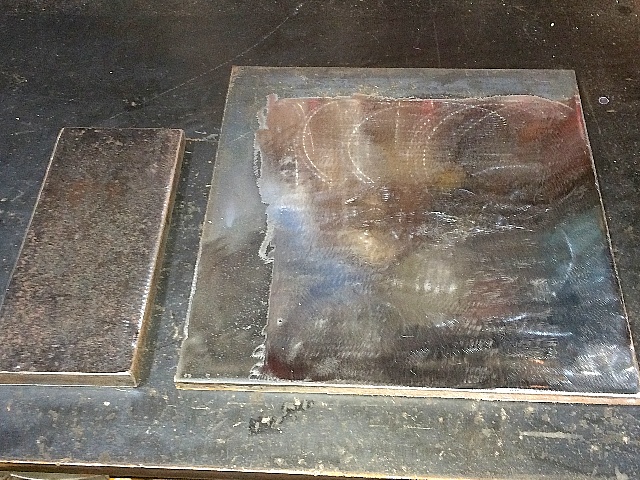
Cleaned 'em up a bit and marked 'em for the cut:
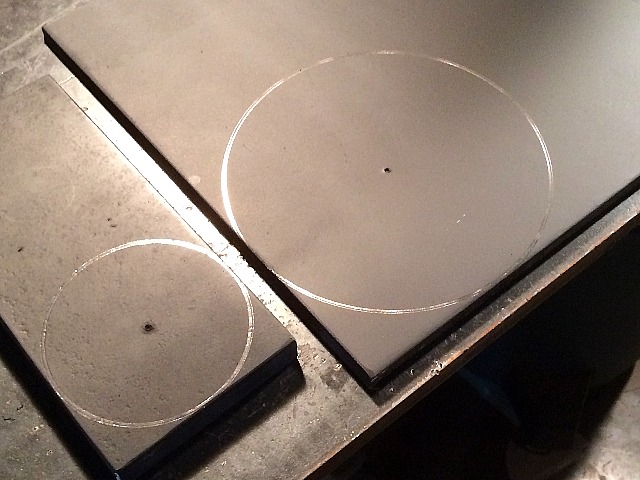
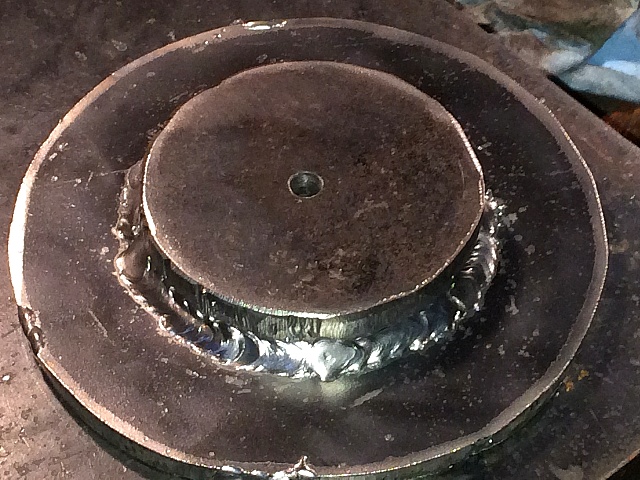
Cut 'em out slightly oversized, welded 'em together, will finish 'em up on a lathe:
Aloha,
Willy
MORE pix here (pg 2), scroll down a ways....
AND here 9pg 3)....
AND here (pg 4)....
Found some 3/4" and 3/8" mild steel plate:
Cleaned 'em up a bit and marked 'em for the cut:
Cut 'em out slightly oversized, welded 'em together, will finish 'em up on a lathe:
Aloha,
Willy
MORE pix here (pg 2), scroll down a ways....
AND here 9pg 3)....
AND here (pg 4)....
Last edited by 2Loose on Fri Jan 16, 2015 7:17 pm, edited 2 times in total.
The faster I go, the behinder I get....
I never look over my shoulder, I know what's back there, and it scares the hell outta me !!
I never look over my shoulder, I know what's back there, and it scares the hell outta me !!
-
2Loose
- Conventioneer
- Posts: 251
- Joined: Wed Aug 27, 2014 12:46 am
- SELF INTRODUCTION: Maui boy, farm systems mechanical engineer, sugar cane and pineapple, retired, chopped a '62 FL in '68, still have it, have five HD projects in the shop right now, three are panheads. Try to work on them every day, but often looking for or waiting for parts. Nothing stock going on here, all hot rod street oriental, and mostly old style.
- Location: Maui
Re: 62 Chopped FL Rebuild
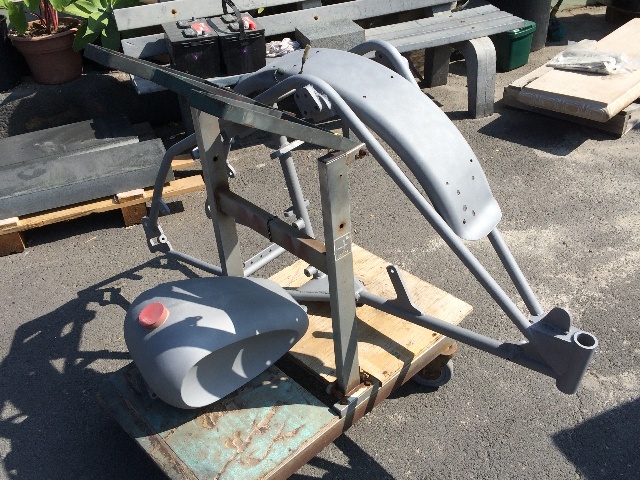
Finally got 'er pulled apart, and the frame and tank are on the way to the media blast guy....
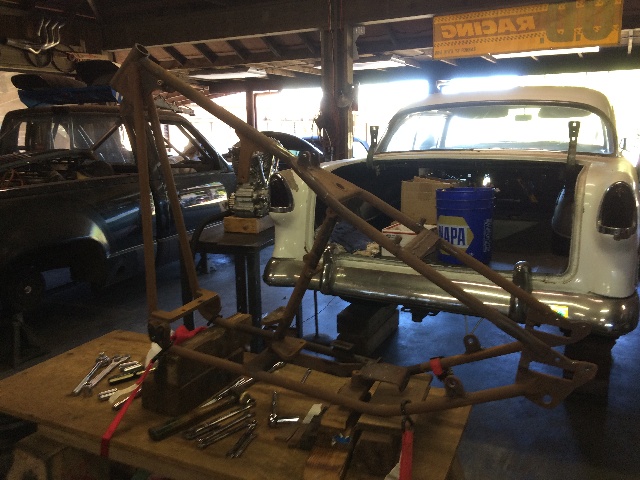
(This is a busy shop, there are presently my bike and my 55 Chevy, plus 2 trucks, a roadster, a 9 second drag strip car, and a couple other basic transport cars just being kept alive....)
All the parts lined up, motor and tranny on another bench....
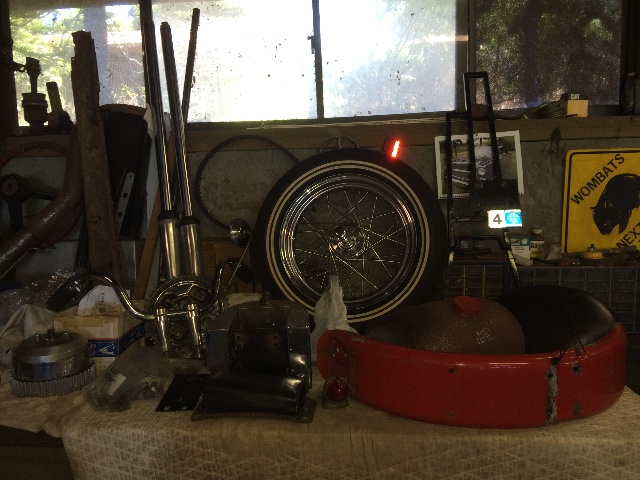
My seat, I made a fiberglass seat pan for this, copied from an original Indian Scout steel pan that I had made a mold off of...

Motor, tranny, wheels, forks are all done. Now to do the rest of it and put it back together!
Aloha,
Willy
more PIX are here....
And here....
(This is a busy shop, there are presently my bike and my 55 Chevy, plus 2 trucks, a roadster, a 9 second drag strip car, and a couple other basic transport cars just being kept alive....)
All the parts lined up, motor and tranny on another bench....
My seat, I made a fiberglass seat pan for this, copied from an original Indian Scout steel pan that I had made a mold off of...
Motor, tranny, wheels, forks are all done. Now to do the rest of it and put it back together!
Aloha,
Willy
more PIX are here....
And here....
-
2Loose
- Conventioneer
- Posts: 251
- Joined: Wed Aug 27, 2014 12:46 am
- SELF INTRODUCTION: Maui boy, farm systems mechanical engineer, sugar cane and pineapple, retired, chopped a '62 FL in '68, still have it, have five HD projects in the shop right now, three are panheads. Try to work on them every day, but often looking for or waiting for parts. Nothing stock going on here, all hot rod street oriental, and mostly old style.
- Location: Maui
Re: 62 Chopped FL Rebuild
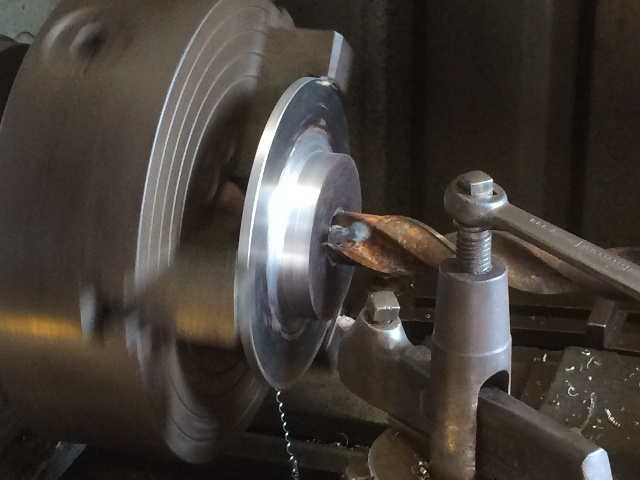
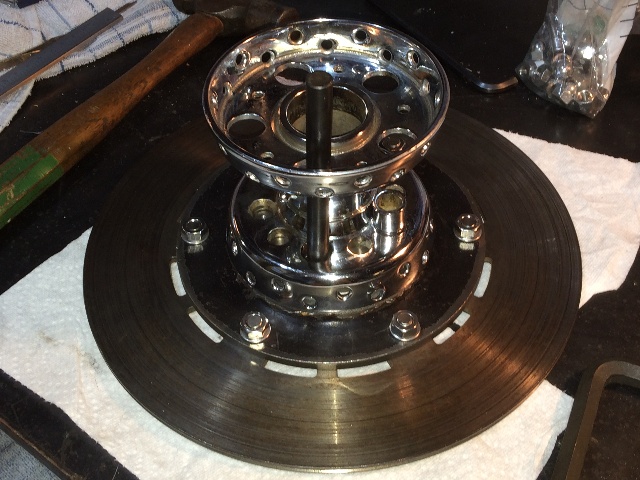
Finally got some lathe time,
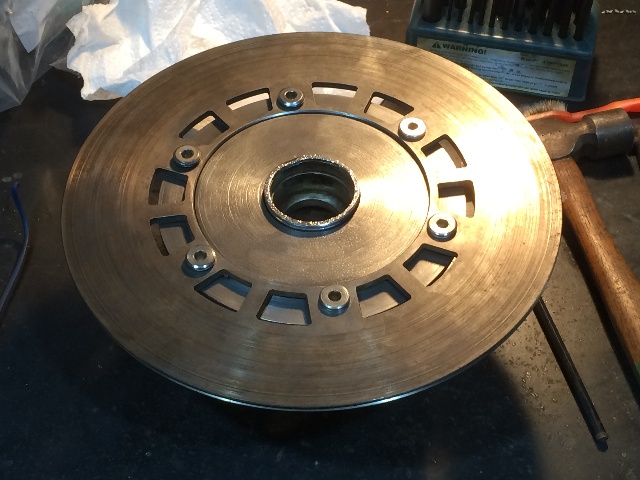
set up the large 3/8" disk to be cut for the rotor carrier first....
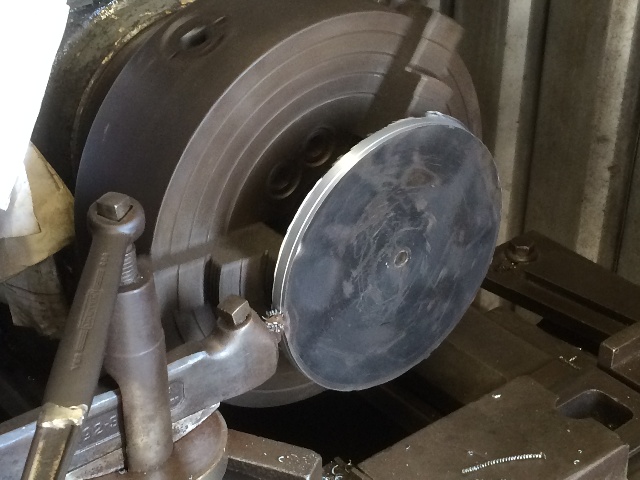
Then cut the 3/16" shoulder to fit the disk rotor....
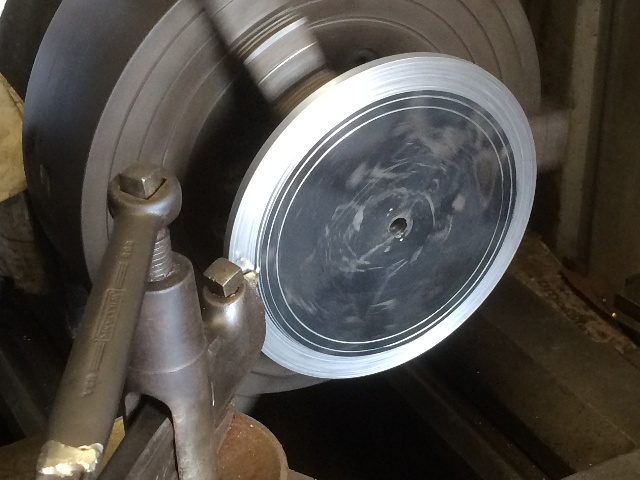
Got a really good fit with the disk, and only cut the shoulder to 1/8", leaving a thicker piece backing
the rotor....
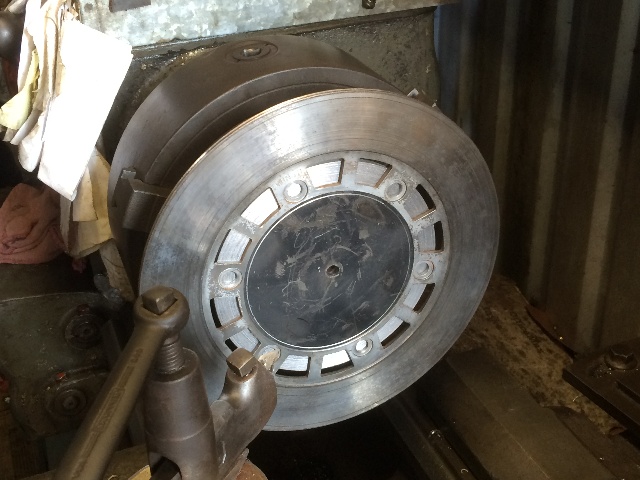
Flipped it around and started on the 3/4" piece to fit in the '62 Star hub....

Cleaned up and beveled out the weld while we were at it....
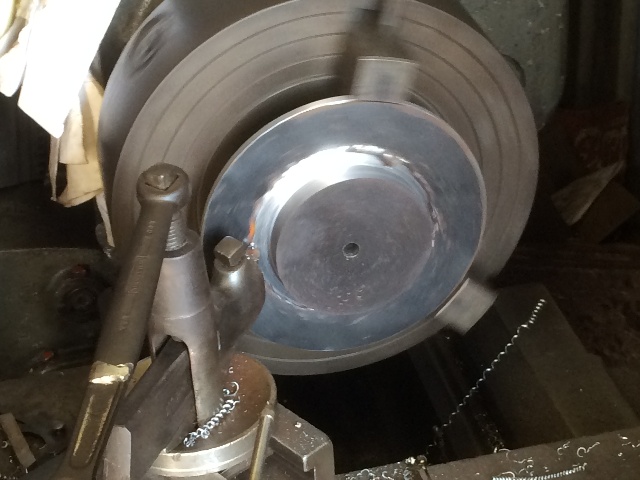
Then ran a series of increasingly larger drill bits in the center until it was large enough to get a
cutting tool in there, and took it out to get a snug fit on the Star hub....
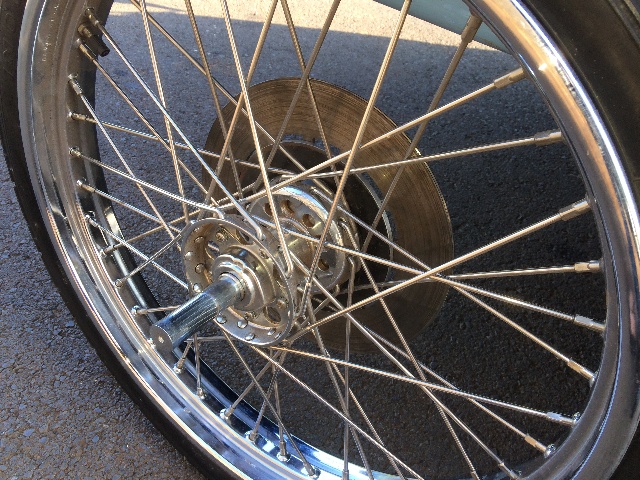
Time for a check fit on the '62's front wheel....
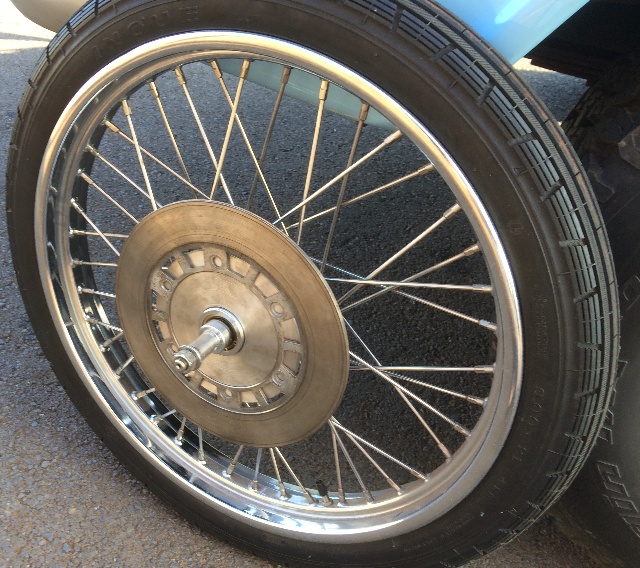
Right side looks good too....
More later,
Willy
set up the large 3/8" disk to be cut for the rotor carrier first....
Then cut the 3/16" shoulder to fit the disk rotor....
Got a really good fit with the disk, and only cut the shoulder to 1/8", leaving a thicker piece backing
the rotor....
Flipped it around and started on the 3/4" piece to fit in the '62 Star hub....
Cleaned up and beveled out the weld while we were at it....
Then ran a series of increasingly larger drill bits in the center until it was large enough to get a
cutting tool in there, and took it out to get a snug fit on the Star hub....
Time for a check fit on the '62's front wheel....
Right side looks good too....
More later,
Willy
The faster I go, the behinder I get....
I never look over my shoulder, I know what's back there, and it scares the hell outta me !!
I never look over my shoulder, I know what's back there, and it scares the hell outta me !!
-
2Loose
- Conventioneer
- Posts: 251
- Joined: Wed Aug 27, 2014 12:46 am
- SELF INTRODUCTION: Maui boy, farm systems mechanical engineer, sugar cane and pineapple, retired, chopped a '62 FL in '68, still have it, have five HD projects in the shop right now, three are panheads. Try to work on them every day, but often looking for or waiting for parts. Nothing stock going on here, all hot rod street oriental, and mostly old style.
- Location: Maui
Re: 62 Chopped FL Rebuild
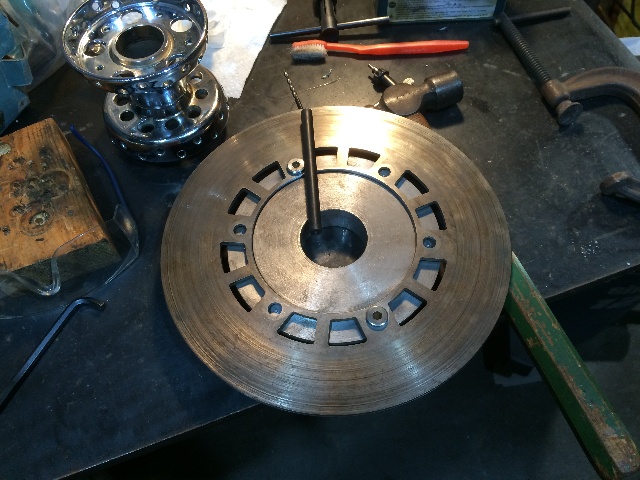
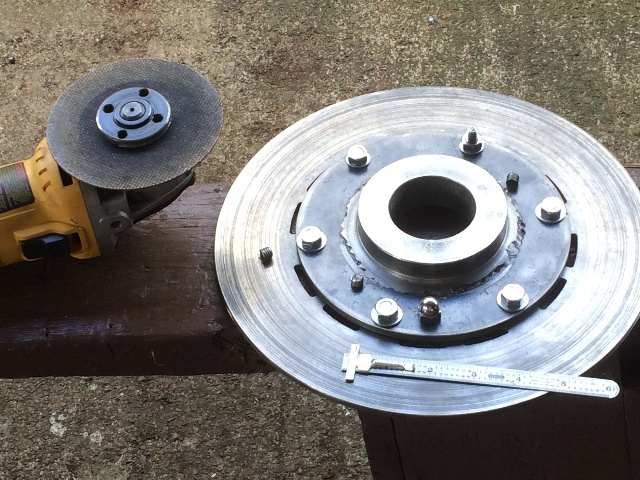
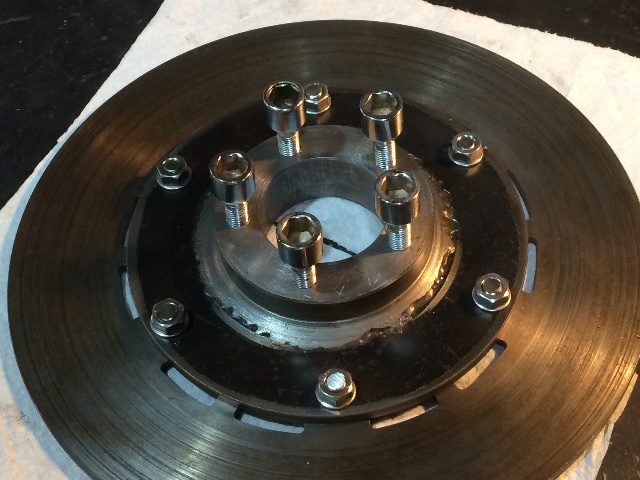
OK, now it's time to drill and tap for the disk on the disk carrier....
The bolts for the original Suzuki rotor are allen head, 8 mm, 1.25 thread.
There is also a 10 mm shoulder on the bolts that fits the 10 mm holes in the rotor, and locks
into the disk carrier an additional 2 mm before the 8 mm thread starts in the carrier.
My transfer punches are all US, but the 13/32" punch fits nicely in the 10 mm hole,
and allows me to accurately center punch the six holes.

Punched, drilled and tapped 2 holes opposite each other.
The tap is an 8 mm, 1.25 thread, so trying to find a starter hole size for the tap
was a bit of a problem. A 6.8 mm drill was spec'd, or 0.268".
A 17/64" bit was used, it is 0.266", just slightly tight for this tap,
But by using a good quality cutting oil, and working the tap through
the metal carefully, it went very well.
Drilled the center punches first with a small bit, I used a 3/32" on this one.
Then followed up with the 17/64" drill, then ran the tap through.

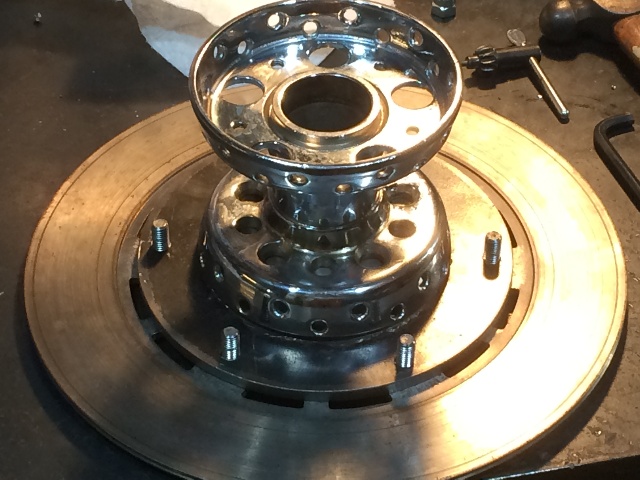
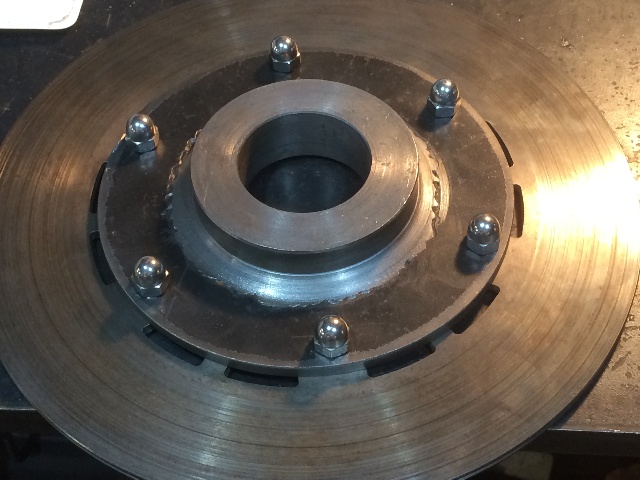
The disk carrier has not been countersunk yet for the shoulder on these bolts,
so flipped the rotor over and put the bolts in for now from the back side just to check it all out.
The bolts are a bit long, and looks like there may be some interference with the spokes.
But I need to get a 10 mm drill to countersink the carrier holes a bit for the shoulders
on these bolts, then I can figure the total bolt length I can get away with on this setup.
Just some pix of the 8 mm tap and the bolts themselves.
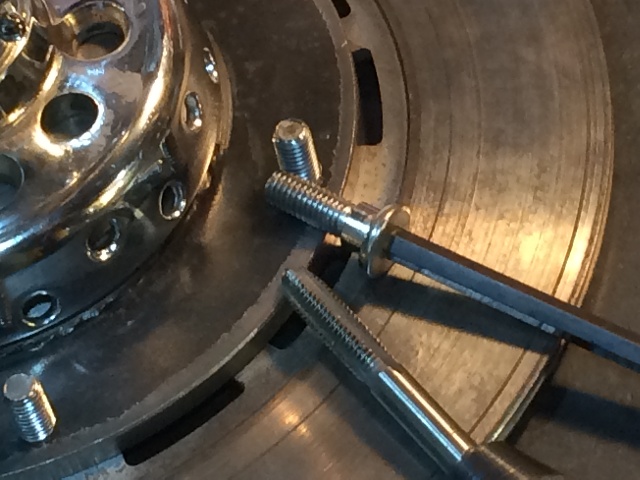
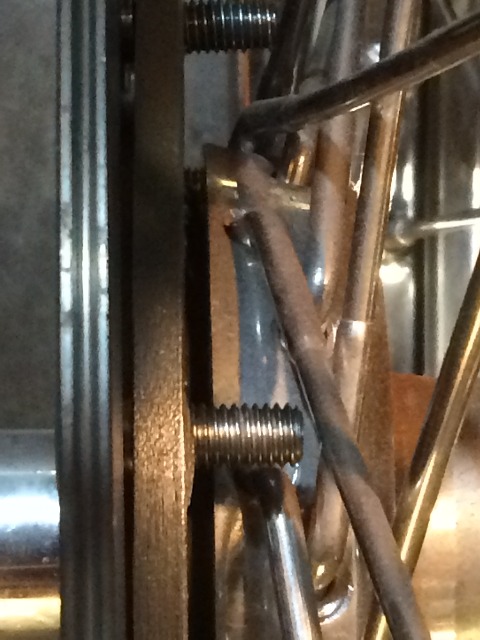
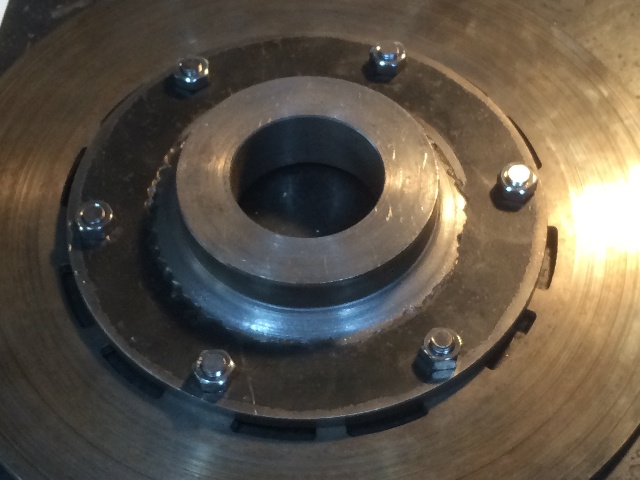
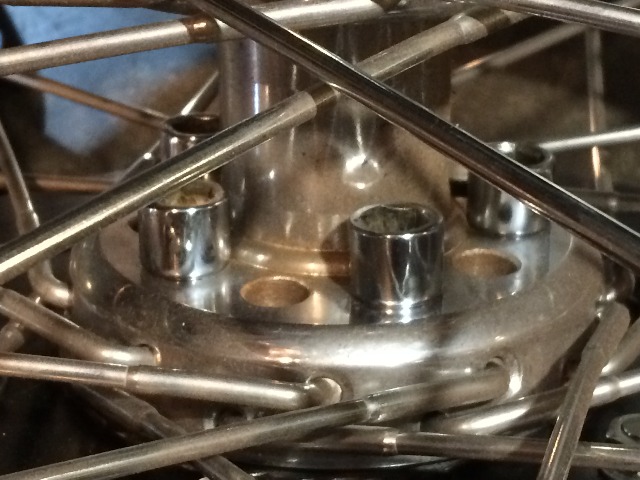
Here you can see why I need to countersink the 10 mm hole into the carrier
to accomodate that shoulder on the bolt....
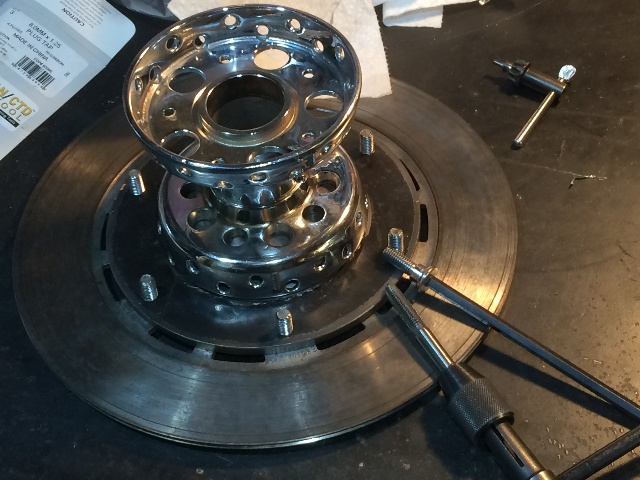
Checking the backside bolt length against the spokes, need to be shortened slightly,
but the carrier needs to be countersunk first, with the rotor flipped back over
which will expose more thread. Want to run some ss acorn nuts on these threads.
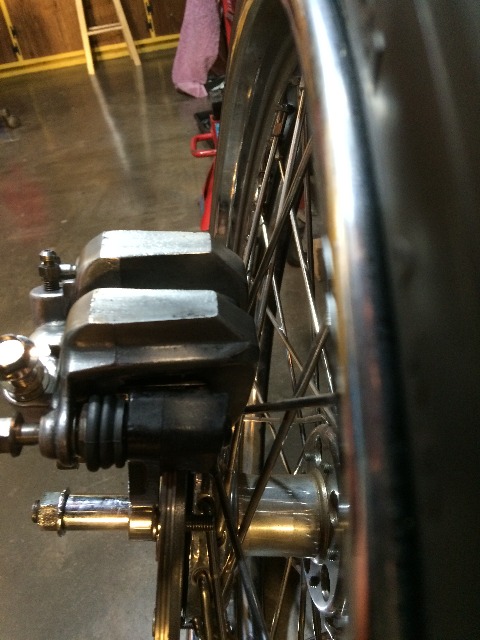
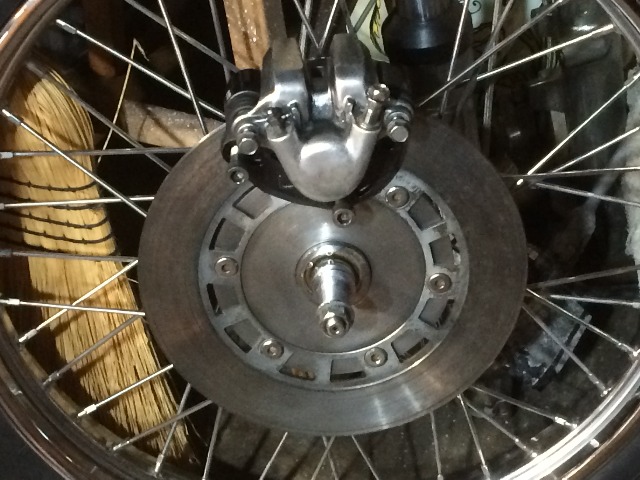
Put the caliper on to check it out, looks good and clears the spokes.

When it is all setup and pressurized will be the final check.
Since the piston is on the outside, the floating caliper will move
away from the spokes as the pads wear down.
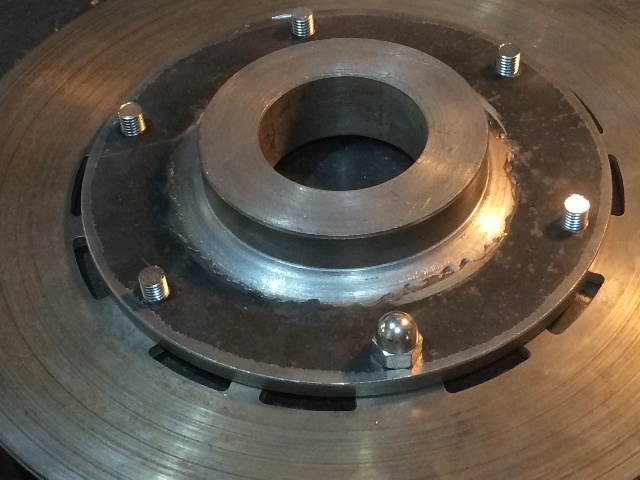
Here the bolt heads are exposed because the carrier holes have not been
countersunk yet, they will be flush with the rotor once the countersunk holes
have been drilled and the rotor flipped over to accommodate the flats on the bolt heads.

More Later,
Aloha,
Willy
More Pix Here....
The bolts for the original Suzuki rotor are allen head, 8 mm, 1.25 thread.
There is also a 10 mm shoulder on the bolts that fits the 10 mm holes in the rotor, and locks
into the disk carrier an additional 2 mm before the 8 mm thread starts in the carrier.
My transfer punches are all US, but the 13/32" punch fits nicely in the 10 mm hole,
and allows me to accurately center punch the six holes.
Punched, drilled and tapped 2 holes opposite each other.
The tap is an 8 mm, 1.25 thread, so trying to find a starter hole size for the tap
was a bit of a problem. A 6.8 mm drill was spec'd, or 0.268".
A 17/64" bit was used, it is 0.266", just slightly tight for this tap,
But by using a good quality cutting oil, and working the tap through
the metal carefully, it went very well.
Drilled the center punches first with a small bit, I used a 3/32" on this one.
Then followed up with the 17/64" drill, then ran the tap through.
The disk carrier has not been countersunk yet for the shoulder on these bolts,
so flipped the rotor over and put the bolts in for now from the back side just to check it all out.
The bolts are a bit long, and looks like there may be some interference with the spokes.
But I need to get a 10 mm drill to countersink the carrier holes a bit for the shoulders
on these bolts, then I can figure the total bolt length I can get away with on this setup.
Just some pix of the 8 mm tap and the bolts themselves.
Here you can see why I need to countersink the 10 mm hole into the carrier
to accomodate that shoulder on the bolt....
Checking the backside bolt length against the spokes, need to be shortened slightly,
but the carrier needs to be countersunk first, with the rotor flipped back over
which will expose more thread. Want to run some ss acorn nuts on these threads.
Put the caliper on to check it out, looks good and clears the spokes.
When it is all setup and pressurized will be the final check.
Since the piston is on the outside, the floating caliper will move
away from the spokes as the pads wear down.
Here the bolt heads are exposed because the carrier holes have not been
countersunk yet, they will be flush with the rotor once the countersunk holes
have been drilled and the rotor flipped over to accommodate the flats on the bolt heads.
More Later,
Aloha,
Willy
More Pix Here....
The faster I go, the behinder I get....
I never look over my shoulder, I know what's back there, and it scares the hell outta me !!
I never look over my shoulder, I know what's back there, and it scares the hell outta me !!
-
budoka

- Site Admin
- Posts: 492
- Joined: Thu Jul 21, 2011 12:51 pm
- SELF INTRODUCTION: I'm a Kentucky boy who's found himself transplanted into Japan. been into turning wrenches as long as i can remember. i love muscle cars, hotrod bikes, and the martial arts.
been a member of this board since back when it was a part of Chopperweb. been handling the tech side and sharing the admin duties for several years now. - Location: Fuefuki Shi, Japan
- Contact:
Re: 62 Chopped FL Rebuild
looks like it's working out really well. i love it when people aren't afraid to deviate from the norm and use good solid parts that work well for them.
heck, i used the front caliper off a Yamaha scooter on mine. it was a Brembo 2 pot caliper, and really cheap. small, and works good too. i think your setup is looking great!
-dan
heck, i used the front caliper off a Yamaha scooter on mine. it was a Brembo 2 pot caliper, and really cheap. small, and works good too. i think your setup is looking great!
-dan
-experience is a wonderful thing. It enables you to recognize a mistake when you make it again.
http://knuckleheadsummer.blogspot.com/
http://knuckleheadsummer.blogspot.com/
-
Customize IT

- Contributor
- Posts: 992
- Joined: Thu Sep 19, 2013 7:54 am
- SELF INTRODUCTION: I am a young punk kid that needs some help building himself a chopper!!
I am sorry I only have a hotmail account???
Tell me what I need to do I need help with my girder!!!
PLESE HELP????
[url=http://imgur.com/8saXkqN][img]http://i.imgur.com/8saXkqNl.jpg[/img][/url]
[url=http://imgur.com/pXJZqQ0][img]http://i.imgur.com/pXJZqQ0l.jpg[/img][/url]
[url=http://imgur.com/T3Q4Ev4][img]http://i.imgur.com/T3Q4Ev4l.jpg[/img][/url]
[url=http://imgur.com/fsXGYQw][img]http://i.imgur.com/fsXGYQwl.jpg[/img][/url] - Location: Ohio, USA
Re: 62 Chopped FL Rebuild
Looks good!
I do not know how slow your drill press will run in speed? I f it will go down to 80 or 100 rpms you can put the tap in the chuck with a cutting paste and be sure to tap straight with your part and drill with the table just as you do with the drill bit. Just clamp the part down and if you have reverse can back the tap back out putting slight pressure on handle going back up and out to pass by the starting tap threads. The tap will pull it self in going down and push out going up just need to get past the narrow part of tap with a small bit of force going back out on handle.
If this is not possible with your drill you can put a center drill in your chuck and the tap will have a center drill mark in the handle/driver end. You can then put pressure down on the quill with the tap being held in place by the center drill in the center hole on end of tap. The with other hand and a cresent wrench turn the tap into the hole. This will ensure it is started straight with the hole just drilled in that clamped location.
Hope that makes sense? and you may have know about it already?
-
2Loose
- Conventioneer
- Posts: 251
- Joined: Wed Aug 27, 2014 12:46 am
- SELF INTRODUCTION: Maui boy, farm systems mechanical engineer, sugar cane and pineapple, retired, chopped a '62 FL in '68, still have it, have five HD projects in the shop right now, three are panheads. Try to work on them every day, but often looking for or waiting for parts. Nothing stock going on here, all hot rod street oriental, and mostly old style.
- Location: Maui
Re: 62 Chopped FL Rebuild
My drill press is a cheapie, does the job OK as long as I don't push it
too hard. Has multiple speeds, of course, just change the belt on
the pulleys, but I prefer to run these bull headed plug taps by hand
and back off when I feel it start to jam, don't have a tapered tap
for this 8mm 1.25 thread and couldn't find one locally.
Worked some more on getting a really good fit for the rotor and the
8mm bolts, with the 10mm shoulders, in my "home made" rotor carrier...
Countersunk the bolt holes on the rotor side with a 25/64" drill,
seemed to work well for the 10 mm shoulder on these rotor bolts....
Two washers and a hex nut provided the correct height on the bolt threads
to shorten them for the acorn nuts....
Perfect fit....
I think this would look good on the spoke side of the brake rotor,
but unfortunately they were just a hair too close to the spokes, so will have to
just run the hex nuts....
The other alternative is to machine a spacer where this center hub fits
into the wheel's star hub to move it out just enough to have the
acorn nuts clear the spokes. I tried positioning the brake carrier
in many positions, but no matter where I put it, at least one or
more of the acorn nuts would hit a spoke and tilt the carrier slightly
preventing it from seating correctly in the star hub !
A thin spacer inside the star hub would correct that.
The rotor side looks great with the rotor flipped to it's correct side
and the bolts counter sunk into the carrier the correct depth....
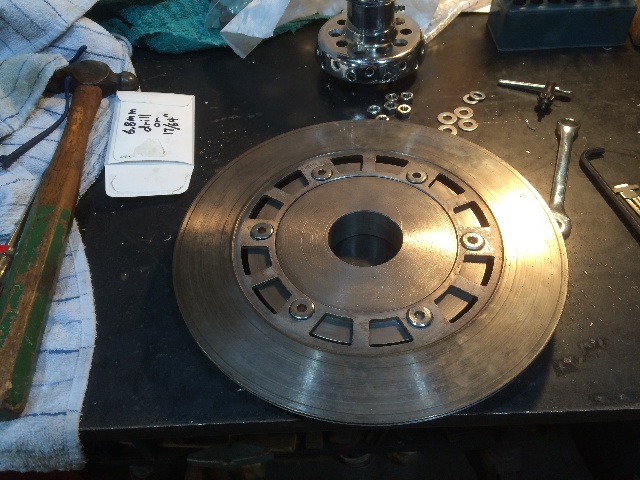
Double checking everything for a good fit....
I want to run either flat washers or lock washers under these hex nuts to
bring them out to be flush with the end of the threads....
But they clear the spokes just fine....
Now to drill and tap the carrier for the 5/8" - 20 threads on the wheel bolts.
As that is a "special" HD thread, I have ordered taps that will cut that thread.
More later on the front disk brake...
too hard. Has multiple speeds, of course, just change the belt on
the pulleys, but I prefer to run these bull headed plug taps by hand
and back off when I feel it start to jam, don't have a tapered tap
for this 8mm 1.25 thread and couldn't find one locally.
Worked some more on getting a really good fit for the rotor and the
8mm bolts, with the 10mm shoulders, in my "home made" rotor carrier...
Countersunk the bolt holes on the rotor side with a 25/64" drill,
seemed to work well for the 10 mm shoulder on these rotor bolts....
Two washers and a hex nut provided the correct height on the bolt threads
to shorten them for the acorn nuts....
Perfect fit....
I think this would look good on the spoke side of the brake rotor,
but unfortunately they were just a hair too close to the spokes, so will have to
just run the hex nuts....
The other alternative is to machine a spacer where this center hub fits
into the wheel's star hub to move it out just enough to have the
acorn nuts clear the spokes. I tried positioning the brake carrier
in many positions, but no matter where I put it, at least one or
more of the acorn nuts would hit a spoke and tilt the carrier slightly
preventing it from seating correctly in the star hub !
A thin spacer inside the star hub would correct that.
The rotor side looks great with the rotor flipped to it's correct side
and the bolts counter sunk into the carrier the correct depth....
Double checking everything for a good fit....
I want to run either flat washers or lock washers under these hex nuts to
bring them out to be flush with the end of the threads....
But they clear the spokes just fine....
Now to drill and tap the carrier for the 5/8" - 20 threads on the wheel bolts.
As that is a "special" HD thread, I have ordered taps that will cut that thread.
More later on the front disk brake...
-
2Loose
- Conventioneer
- Posts: 251
- Joined: Wed Aug 27, 2014 12:46 am
- SELF INTRODUCTION: Maui boy, farm systems mechanical engineer, sugar cane and pineapple, retired, chopped a '62 FL in '68, still have it, have five HD projects in the shop right now, three are panheads. Try to work on them every day, but often looking for or waiting for parts. Nothing stock going on here, all hot rod street oriental, and mostly old style.
- Location: Maui
Re: 62 Chopped FL Rebuild
Back to the rest of the bike....
Tryin' to match the original red I used back in the late 60's on this bike.
Compared it to the red on my '58 Chevy truck, which is a GM Torch Red,
It's pretty close....

Think I'm gonna go ahead with the truck color
In the meantime, sent the frame, tank and rear fender off to the sandblaster....
I actually like that light gray color a lot !!
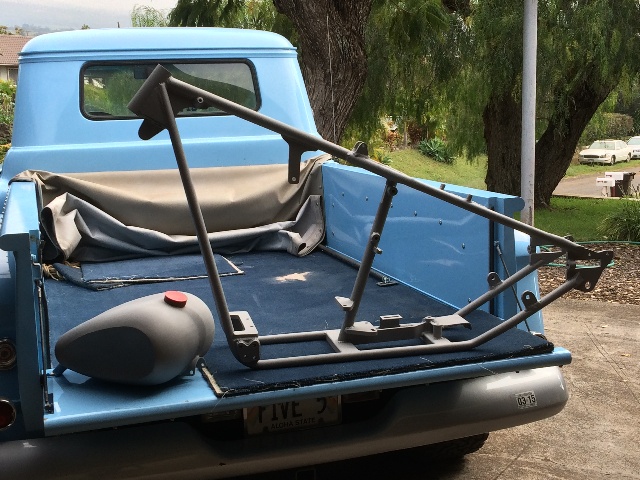
Yeah, that's my '55 Chevy Viking series 4x4 parts chaser....
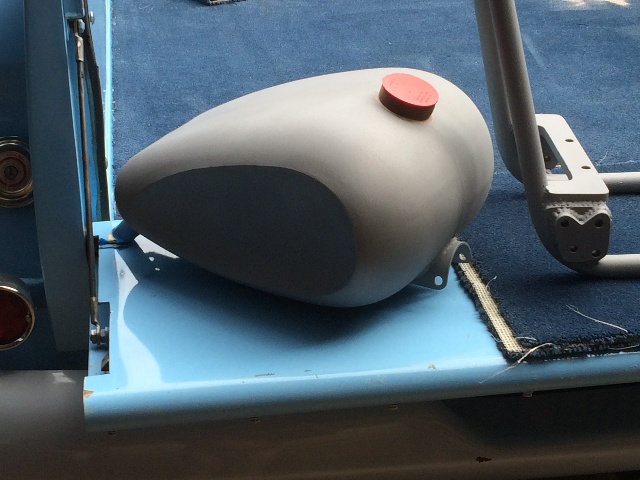
I love this tank, want to do something special with the concave on the sides....
More Later....
Tryin' to match the original red I used back in the late 60's on this bike.
Compared it to the red on my '58 Chevy truck, which is a GM Torch Red,
It's pretty close....
Think I'm gonna go ahead with the truck color
In the meantime, sent the frame, tank and rear fender off to the sandblaster....
I actually like that light gray color a lot !!
Yeah, that's my '55 Chevy Viking series 4x4 parts chaser....
I love this tank, want to do something special with the concave on the sides....
More Later....
-
curt

- Long in the Tooth
- Posts: 1102
- Joined: Tue Oct 25, 2011 11:36 am
- SELF INTRODUCTION: hi everyone its me from the old bord hopeing to see everyone come here and all the newcomers . lets make this as good as the old one or even better . lookin foreward to seeing everyones projects continue and ill be continueing mine too
- Location: utica new york
Re: 62 Chopped FL Rebuild
ever notice when you hit somethin or someone with a hammer you feel instantly better
-
2Loose
- Conventioneer
- Posts: 251
- Joined: Wed Aug 27, 2014 12:46 am
- SELF INTRODUCTION: Maui boy, farm systems mechanical engineer, sugar cane and pineapple, retired, chopped a '62 FL in '68, still have it, have five HD projects in the shop right now, three are panheads. Try to work on them every day, but often looking for or waiting for parts. Nothing stock going on here, all hot rod street oriental, and mostly old style.
- Location: Maui
Re: 62 Chopped FL Rebuild
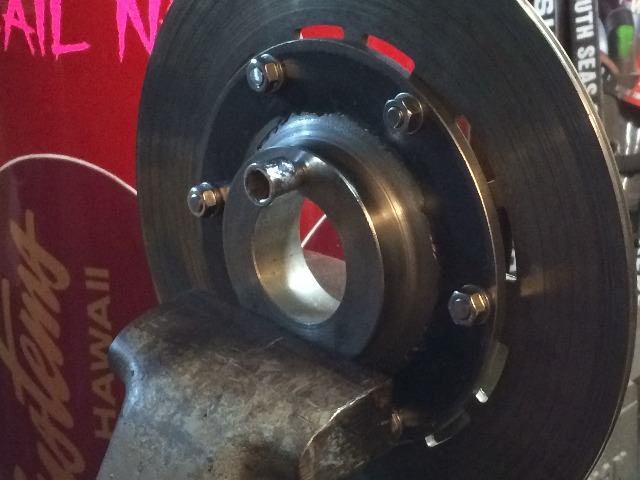
The taps came in, so I transfer punched, drilled and tapped one hole, and
it was a perfect fit on the star hub....
In my tool drawer I have two standard 3/8" taps, a 3/8"-16 NC that requires a 5/16" drill (0.3125")
and a 3/8"-24 NF that requires a Q drill (0.332") and I could not find a reference
for the drill size for this 3/8"-20 tap, so I tried a 21/64" drill (0.328") and the tap was tight
on that first hole, but I got it done....
The hole and bolt were a perfect fit on the star hub....
Since that first hole was really too tight for the tap, I moved up to a Q bit (0.328)
I transfer punched the other four holes, and drilled the 1/16" centering holes.
Drilled the four holes with the "Q" drill bit and tapped them.
The taps felt right this time, not too tight or too loose.
These are blind holes, drilled roughly 1/8" deeper than the HD wheel bolt threads.
Ran the plug tap in first, then the bottom tap to run clean threads all the way down.

The bolts all go in perfectly, and go all the way in, no problem...
The bolts and holes matched up perfectly to the star hub on the 21" wheel I'm going to use!
Just a closer look, I should never have a problem with this....
Now to design and fabricate the bracket to mount the caliper on.
Willy
it was a perfect fit on the star hub....
In my tool drawer I have two standard 3/8" taps, a 3/8"-16 NC that requires a 5/16" drill (0.3125")
and a 3/8"-24 NF that requires a Q drill (0.332") and I could not find a reference
for the drill size for this 3/8"-20 tap, so I tried a 21/64" drill (0.328") and the tap was tight
on that first hole, but I got it done....
The hole and bolt were a perfect fit on the star hub....
Since that first hole was really too tight for the tap, I moved up to a Q bit (0.328)
I transfer punched the other four holes, and drilled the 1/16" centering holes.
Drilled the four holes with the "Q" drill bit and tapped them.
The taps felt right this time, not too tight or too loose.
These are blind holes, drilled roughly 1/8" deeper than the HD wheel bolt threads.
Ran the plug tap in first, then the bottom tap to run clean threads all the way down.
The bolts all go in perfectly, and go all the way in, no problem...
The bolts and holes matched up perfectly to the star hub on the 21" wheel I'm going to use!
Just a closer look, I should never have a problem with this....
Now to design and fabricate the bracket to mount the caliper on.
Willy
-
2Loose
- Conventioneer
- Posts: 251
- Joined: Wed Aug 27, 2014 12:46 am
- SELF INTRODUCTION: Maui boy, farm systems mechanical engineer, sugar cane and pineapple, retired, chopped a '62 FL in '68, still have it, have five HD projects in the shop right now, three are panheads. Try to work on them every day, but often looking for or waiting for parts. Nothing stock going on here, all hot rod street oriental, and mostly old style.
- Location: Maui
Re: 62 Chopped FL Rebuild
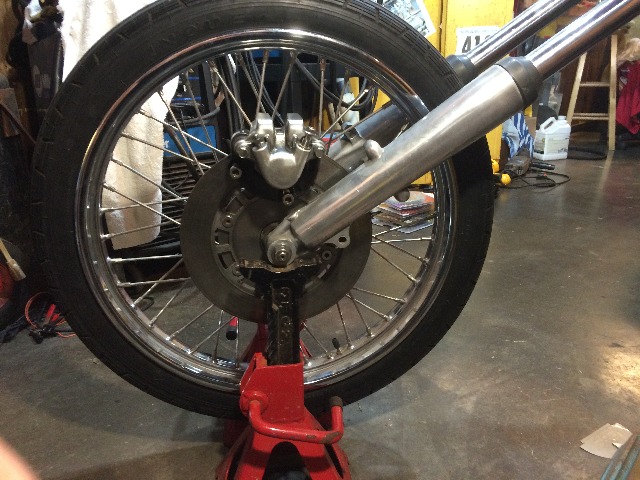
Now to design and fabricate the bracket to mount the caliper on.
This is roughly the position for the caliper, up slightly, it's sitting on the disk now.

A rough sketch of what I am thinking, a bracket that floats on the axle to provide
vertical position, then a link to the old drum brake tab on the fork slider.
All cut from 1/4" steel.
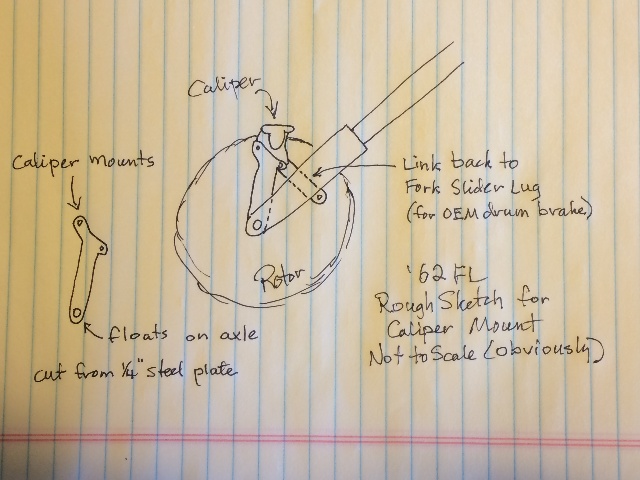
And I need to decide if that link back to the drum brake tab on the fork slider should be floating
or rigid....
Willy
This is roughly the position for the caliper, up slightly, it's sitting on the disk now.
A rough sketch of what I am thinking, a bracket that floats on the axle to provide
vertical position, then a link to the old drum brake tab on the fork slider.
All cut from 1/4" steel.
And I need to decide if that link back to the drum brake tab on the fork slider should be floating
or rigid....
Willy
-
2Loose
- Conventioneer
- Posts: 251
- Joined: Wed Aug 27, 2014 12:46 am
- SELF INTRODUCTION: Maui boy, farm systems mechanical engineer, sugar cane and pineapple, retired, chopped a '62 FL in '68, still have it, have five HD projects in the shop right now, three are panheads. Try to work on them every day, but often looking for or waiting for parts. Nothing stock going on here, all hot rod street oriental, and mostly old style.
- Location: Maui
Re: 62 Chopped FL Rebuild
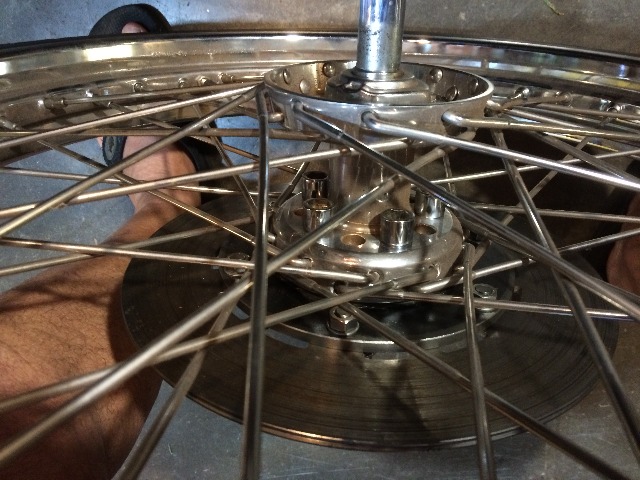
Put the front forks together, put the wheel and brake rotor on,
and propped up the axle so the wheel can spin....
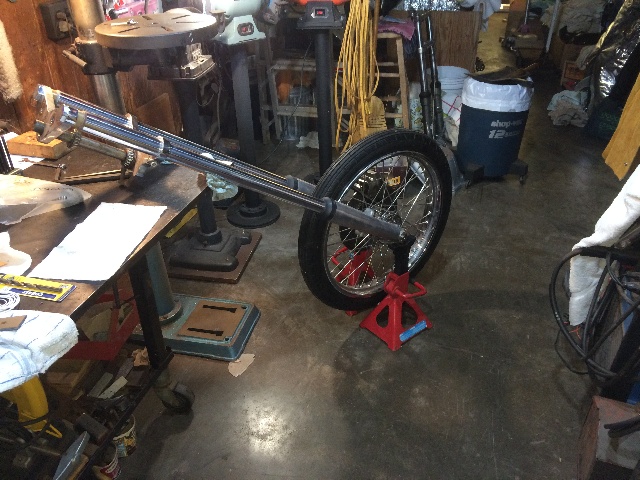
Here you can see how tight this space is, 1"....
I got that rotor right where I want it !
AND, it spins true, no wobble at all....
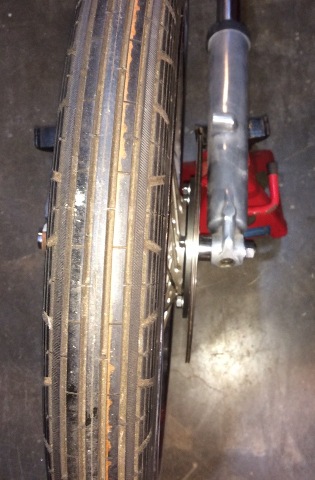
The caliper looks good up here....
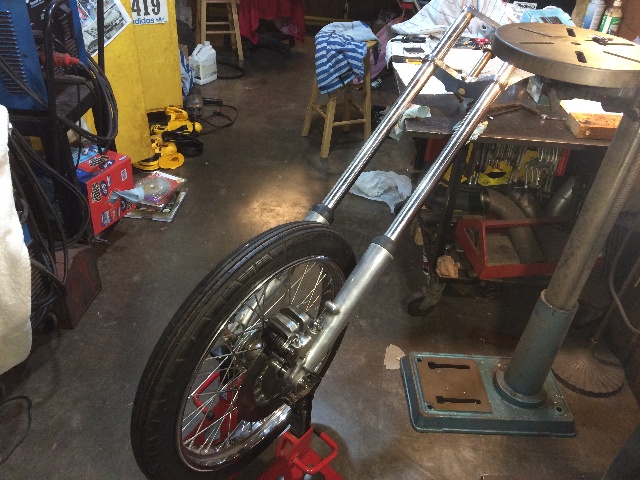
Maybe a little further back, almost touching the fork leg....
Or maybe it should go under the fork leg ??
It looks like the mounting bracket would be smaller and fit better in this location....

More Later,
Willy
and propped up the axle so the wheel can spin....
Here you can see how tight this space is, 1"....
I got that rotor right where I want it !
AND, it spins true, no wobble at all....
The caliper looks good up here....
Maybe a little further back, almost touching the fork leg....
Or maybe it should go under the fork leg ??
It looks like the mounting bracket would be smaller and fit better in this location....
More Later,
Willy